
Configure Splunk to Use a vCenter/PSC as a SAML IdP
Why Use a VMware vSphere Platform Service Controller?
As mentioned in a previous post, Splunk Enterprise is a fantastic application for handling the massive amount of log data generated by VMware virtualization environments. Since every VMware vCenter deployment includes at least a single Platform Service Controller (PSC), you can easily configure your Splunk Enterprise deployment to use the same authentication services making it easier to access your log data.
Items to Keep in Mind
- Splunk Enterprise requires that the following information be passed back as part of the SAML assertion from the IdP: Role
- Splunk Enterprise will use the following information if it is passed back as part of the SAML assertion from the IdP: Email, Real Name
- As of Splunk Enterprise version 7.30, encryption of SAML assertions is not supported
Assumptions
This post assumes the following:
- A fully functioning Splunk Enterprise deployment already exists
- Splunk Enterprise is configured to utilize HTTPS
- Splunk Enterprise and the vSphere PSC can communicate with each other via TCP 443
- This post is based on Splunk Enterprise 7.3.0 and VMware vSphere 6.7
Download the vSphere Platform Service Controller Identity Provider Metadata XML
The first step to configuring this solution is to download the SAML identity provider metadata from the vSphere PSC. Unfortunately, the HTML 5 vSphere Client does not include the configuration page to downloading the SAML IdP metadata. Instead, we’ll need to log into the vCenter Server utilizing the legacy Flash-based vSphere Web Client by browsing to https://
Select the Administration menu from the left side of the client. On the resulting screen, select the Configuration option under the Single Sign-On heading from the left side of the client. Then select the SAML Service Providers tab from the top of the resulting screen.

Next, you will need to click on the Download… button next to the text “Metadata for your SAML service provider:” text. You’ll be prompted to download a file with the name “vsphere.local.xml” (assuming your vSphere SSO domain is using the default name).
Configuring Splunk Enterprise for SAML Authentication
Import the SAML IdP Metadata into Splunk Enterprise
To being the process, access your Splunk Enterprise deployment’s Access Controls configuration via the following URL https://

Next, select Authentication method to load the Authentication Method settings page. Select SAML from the list of External authentication methods.

Click the SAML Settings link to access the SAML Groups settings page then click on the green SAML Configuration button at the top right of the page. This opens the SAML Configuration dialog box to allow for us to begin configuring the SAML integration.


Click the Select File button next to the Metadata XML File label to import our IdP metadata XML file. Select the vsphere.local.xml file that you downloaded from your VMware vSphere PSC. This will populate several of the SAML configuration fields with information specific to your IdP.
Configure Additional SAML IdP Settings in Splunk Enterprise
We now need to modify the following settings:
- Clear the Single Log Out (SLO) URL. Unfortunately, the SLO path provided by the VMware vSphere PSC does not appear to work with Splunk Enterprise.
- Set Replicate Certificates to true
- Enter a unique name into the Entity ID field that will represent your Splunk Enterprise instance when adding it to the VMware vSphere PSC. For this example, we will use “splunkweb”
- Set Sign AuthnRequest to true
- Set Verify SAML Response to false
- Expand the Alias section
- Set Role Alias to “http://rsa.com/schemas/attr-names/2009/01/GroupIdentity"
- Enter the FQDN used to access your Splunk Enterprise deployment into the Fully qualified domain name or IP of the load balancer field
- Set SSO Binding to HTTP Redirect
- Set the Signature Algorithm to SHA256

Click the Save button to save the SAML Configuration to Splunk Enterprise.
Define SAML Groups in Splunk Enterprise for Splunk Roles
One advantage of using the VMware vSphere PSC over VMware Identity Manager is that the VMware vSphere PSC will pass all the of the security groups that the user is a member of. This allows you to reference security groups that the PSC is aware of when assigning Splunk Enterprise roles.
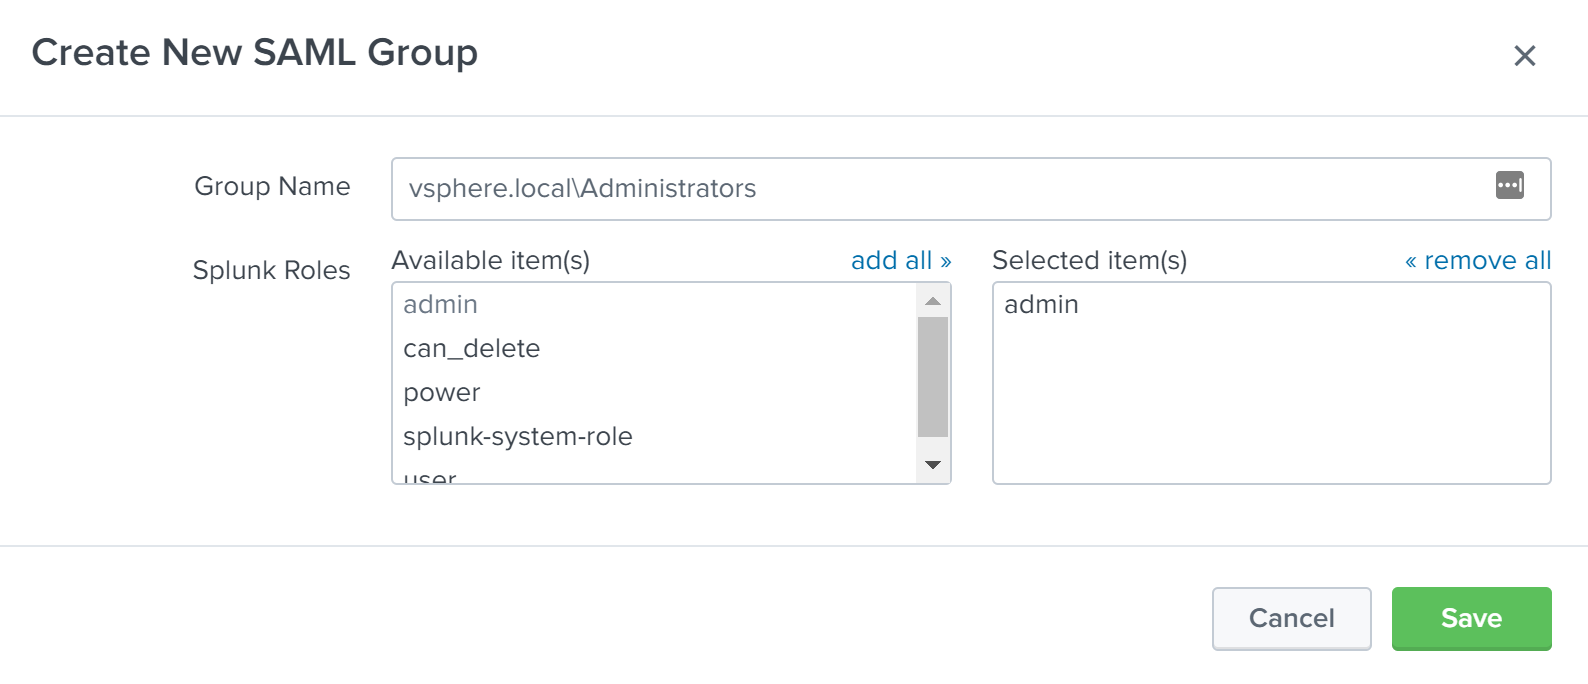
In this example, we will configure one SAML Group for use in assigning Splunk Enterprise roles. We will add the “vsphere.local\Administrators” group into Splunk Enterprise and configure it to have the “admin” role. To create the group, click the New Group button on the SAML Groups page. Enter “vsphere.local\Administrators” into the Group Name field, then click on “admin” in the Available item(s) list next to Splunk Roles to add the “admin” role to the Selected item(s) list. Click the Save button to add the SAML group.
Download the Splunk Enterprise SAML Service Provider (SP) Metadata XML
Now that we have configured Splunk Enterprise to utilize SAML Authentication, we need to download the SAML Service Provider metadata XML file from Splunk Enterprise. We will later import this file into the VMware vSphere PSC. To download the metadata XML, click on the green SAML Configuration button at the top right of the SAML Groups page. Then click on the Download File button next to the SP Metadata File label.

Splunk Enterprise is now configured to utilize the VMware vSphere PSC as a SAML IdP for all future authentication requests.
Adding Splunk Enterprise to VMware vSphere Platform Service Controller
Next, we will add Splunk Enterprise as a trusted SAML Service Provider into the vSphere PSC.
Adding a Trusted SAML Service Provider to the VMware vSphere Platform Service Controller
Log into the vCenter Server utilizing the legacy Flash-based vSphere Web Client by browsing to https://
Next click the Import… button to the right of “Metadata from your SAML service provider:”. On the resulting “Import Service Provider SAML Metadata” dialog box, click the Import from File… button. Select the “SPMetadata.xml” file that you just downloaded from your Splunk Enterprise deployment. The Metadata XML box should now contain the contents of the XML file.

Now before we import the data, we need to make one small change. Go to the last part of the XML data and find the section that begins with “<md:SingleLogoutService”. Shortly after that, there should be an “index=0”. You will need to remove the “index=0” from the line or the vSphere Web Client will generate an error during the import. Now that XML has been updated, click on the Import button to import initiate the import of the metadata into the VMware vSphere PSC.
Conclusion
Now that the VMware vSphere PSC and Splunk Enterprise deployments are both configured, you should now be able to log into your Splunk Enterprise deployment by utilizing the VMware vSphere PSC. It should be noted that the VMware vSphere PSC does not pass a user’s email address or full name back as fields that can be used in Splunk Enterprise. However, users can update these values if the need to once they are logged into Splunk Enterprise.


See Also
- Configure Splunk to Use VMware Identity Manager as a SAML IdP -
- DISA Releases Updated VMware vSphere 6.5 STIGs - Version 1, Release 2 -
- vRealize Operations Compliance Alerts for the vSphere 6.5 ESXi STIG -
- vRealize Operations Compliance Alerts for the vSphere 6.5 Virtual Machine STIG -
- DISA Releases STIGs for VMware vSphere 6.5 -
Search
Get Notified of Future Posts
Follow Me


Recent Posts