Working with Tags in vRealize Automation 8.0
vRealize Automation 8.0 brought with it a completely new method for controlling access to resources within our cloud environments. In previous versions of vRealize Automation, the concept of a Reservation existed, which provided a clear contract as to what compute, storage, and network resources a particular Business Group had access to as well as limits on the amount of memory and storage resources that the Business Group could consume. Fast forward to vRealize Automation 8.0, tags have become the primary means of controlling, which compute, storage, and network resources a particular Project can access. In this post, we will further explore how we can utilize tags to control access to our cloud resources.
What are Tags and Why Would I Use Them?
Simply put, a tag is a word or phrase that classifies objects in vRealize Automation. While a single value can be specified for a tag, it is best practice to utilize name-value pairs specified in the format name:value. This concept should be familiar to many users of vSphere as tags have existed in the vSphere Web and HTML5 Clients for many years. To assist users who currently utilize tags today, any tags that you have defined in your vSphere environment, as well as external cloud providers, will automatically be discovered and imported into vRealize Automation 8.0.
Tags serve several purposes within vRealize Automation 8.0, with the primary purpose being to match capabilities and constraints for Blueprints and Projects in relation to Compute, Network, and Extensibility resources. Through the matching of these tags, vRealize Automation Cloud Assembly can determine the appropriates resources to utilize when provisions cloud resources.
Additionally, tags can also be utilized for searching, sorting, and reporting on objects within vRealize Automation. The Manage Tags page within Cloud Assembly makes it easy for users to search and filter based on existing tags and returns a list of resources that match the specified search criteria.
Types of Tags
Capability tags are used for labeling resources that possess specific capabilities within the cloud. A typical scenario for capability tags is the tagging of compute resources to classify them as appropriate for production vs. development workloads or specific licensing limitations. An example of these tags could be Environment:Production Environment:Development, or Licensed Application:Microsoft SQL Server.
Constraint tags, on the other hand, are for controlling access to resources. These are utilized within Projects to specify which compute, network, or extensibility resources a particular project should be allowed access. A common use case for constraint tags would be to limit a Project to provision resources at a specific site or only within networks that belong to the Project. An example of these tags could be Department:Finance, Department:Sales, or Location:London.
Defining Our Scenario
For this walkthrough, we will assume a typical scenario where a business has multiple departments. Each department is assigned a production and development network. Our goal is to ensure that depending on the type of VM provisioned (production or development), the VM will be assigned to the proper network. For this example, we will define two Projects: Engineering and Sales, and four Network Profiles: Engineering - Prod, Engineering - Dev, Sales - Prod, Sales Dev. If you need assistance in setting up your Projects, please refer to my previous post Getting Started with vRealize Automation 8.0 Cloud Assembly.
On the next page of this post, we will walk through the process of limiting access to networks based on the department assigned to a Project.
Controlling Access to Network Resources
Controlling which networks get used during the provisioning process requires that we assign matching tags to both the Network Profiles and the Projects within vRealize Automation 8.0 Cloud Assembly. In this example, we want to classify our networks based on two sets of tags. The first set of tags will determine the network environment. We will utilize the tag values of Environment:Production and Environment:Development. The second set of tags define the department names that we would like to use for matching the Projects to the Network Profiles. We will utilize the values of Department: Sales and Department:Engineering.
Create Our Network Profiles
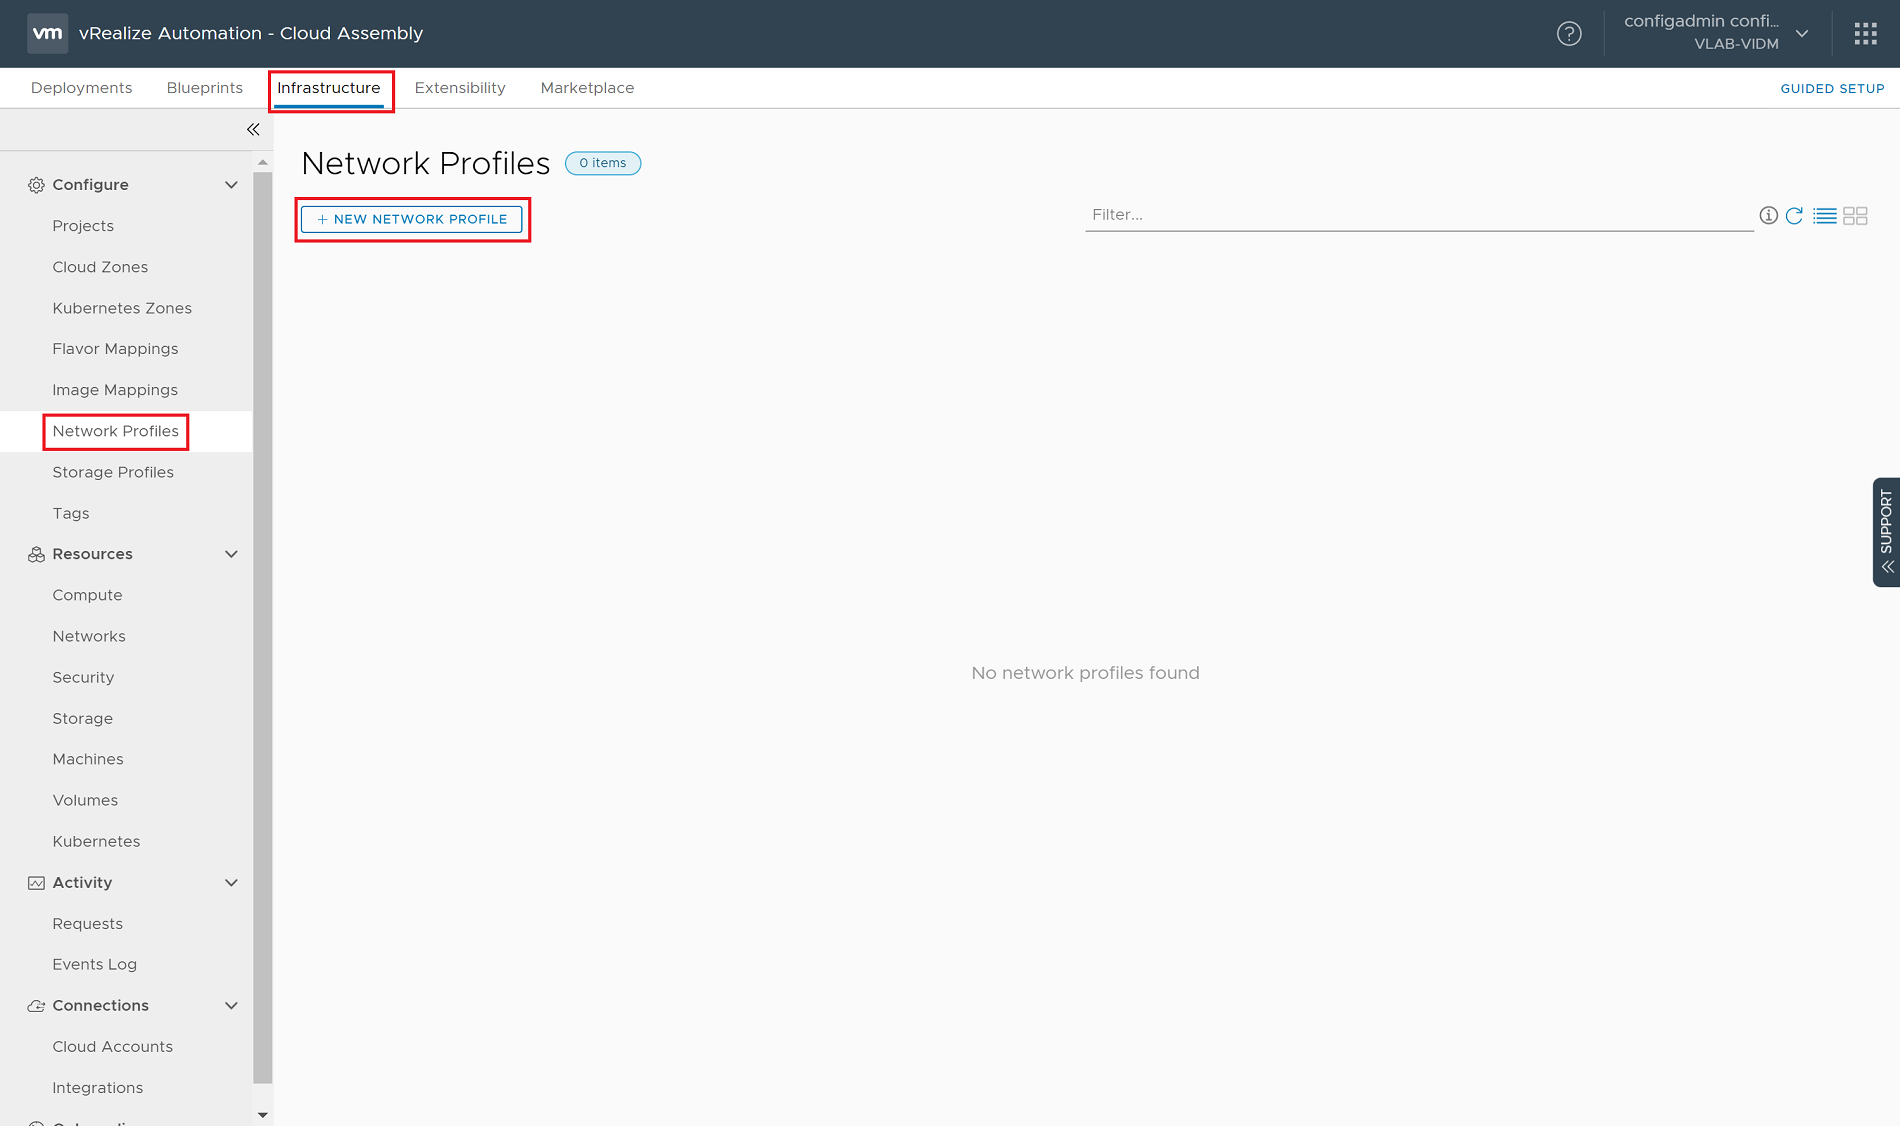
vRealize Automation 8.0 Cloud Assembly provides us with two methods to define these tags. The first method is to utilize the Tag Management configuration. The second is to define the new tags directly on the objects that we wish to tag. For this walkthrough, we’ll utilize this method as it is the quickest/most straightforward method. To get started, make sure you log in to vRealize Automation 8.0 with an account that is assigned the Cloud Assembly Administrator role. Once logged in, select Cloud Assembly from your available services within the Cloud Services Console. Within Cloud Assembly, click on the Infrastructure tab at the top of the page, then select Network Profiles from the left side under the Configure section. Click the + New Network Profile button to begin creating our first Network Profile.
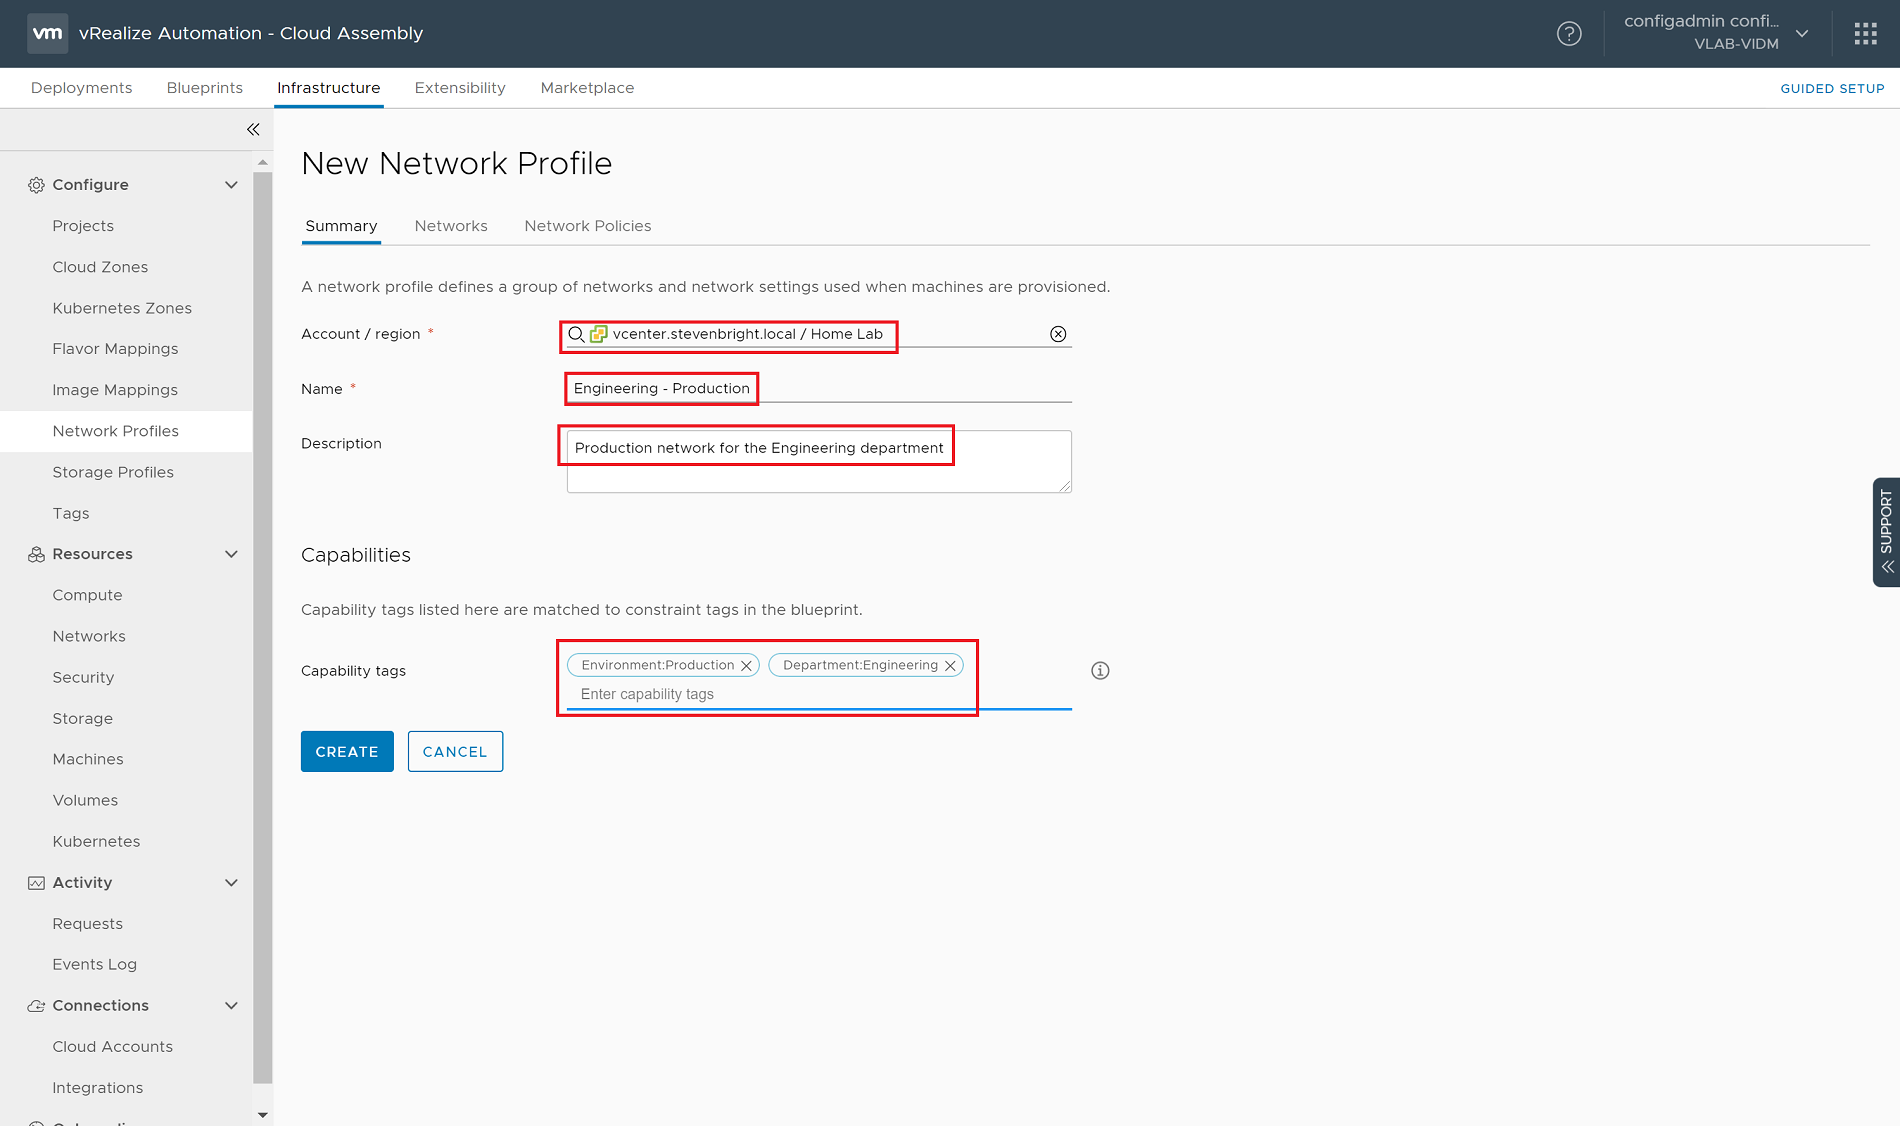
On the New Network Profile wizard, first, select the Account/region where our networks exist. Next, provide a name for the profile. In this example, we will first create our production network for the Engineering team. We assign it the name “Engineering - Production”. An optional description can be provided for the Description field. The last remaining field on the Summary tab of the wizard is to define the Capability tags field. Capability Tags are where we specify our department and environment tags. Within the field, enter the following values and hit the Enter key after each to generate and assign the following new tags: “Environment:Production” and “Departement:Engineering”.
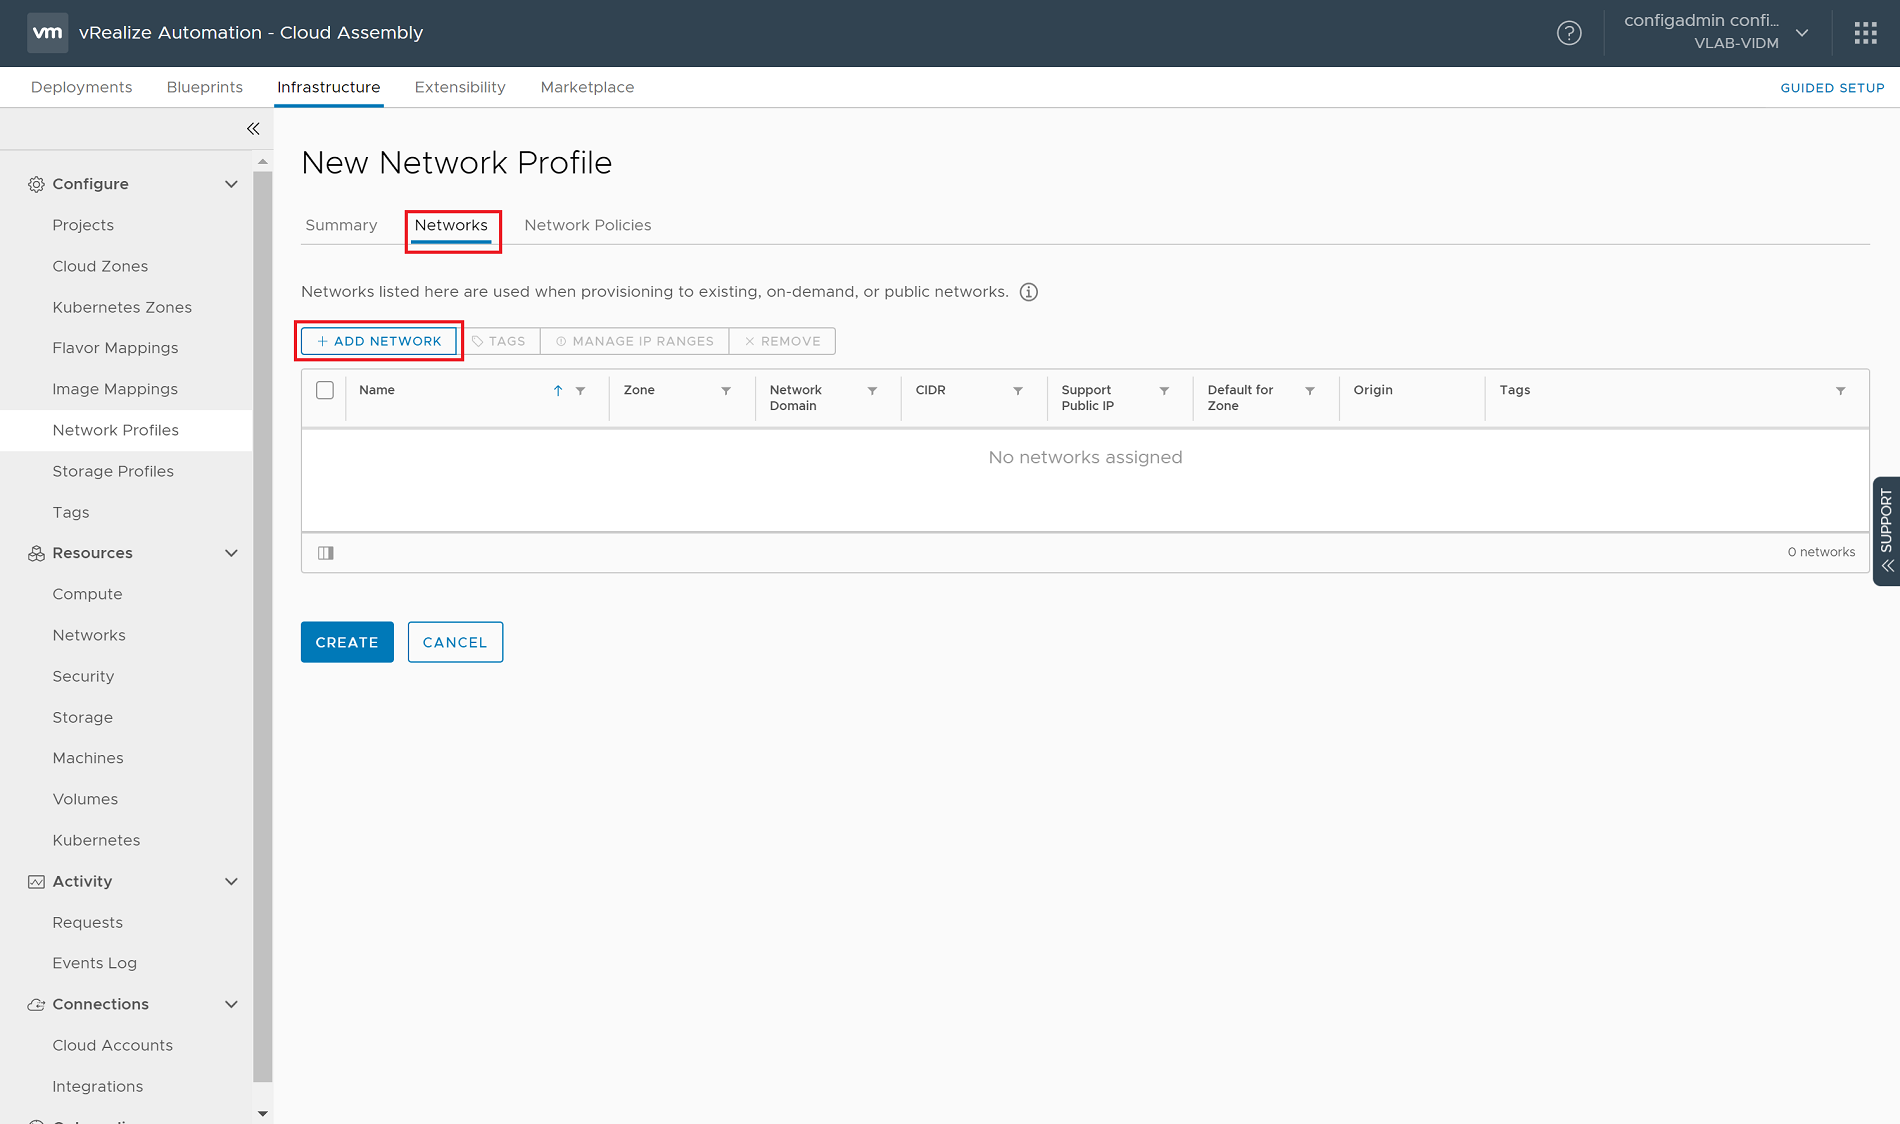
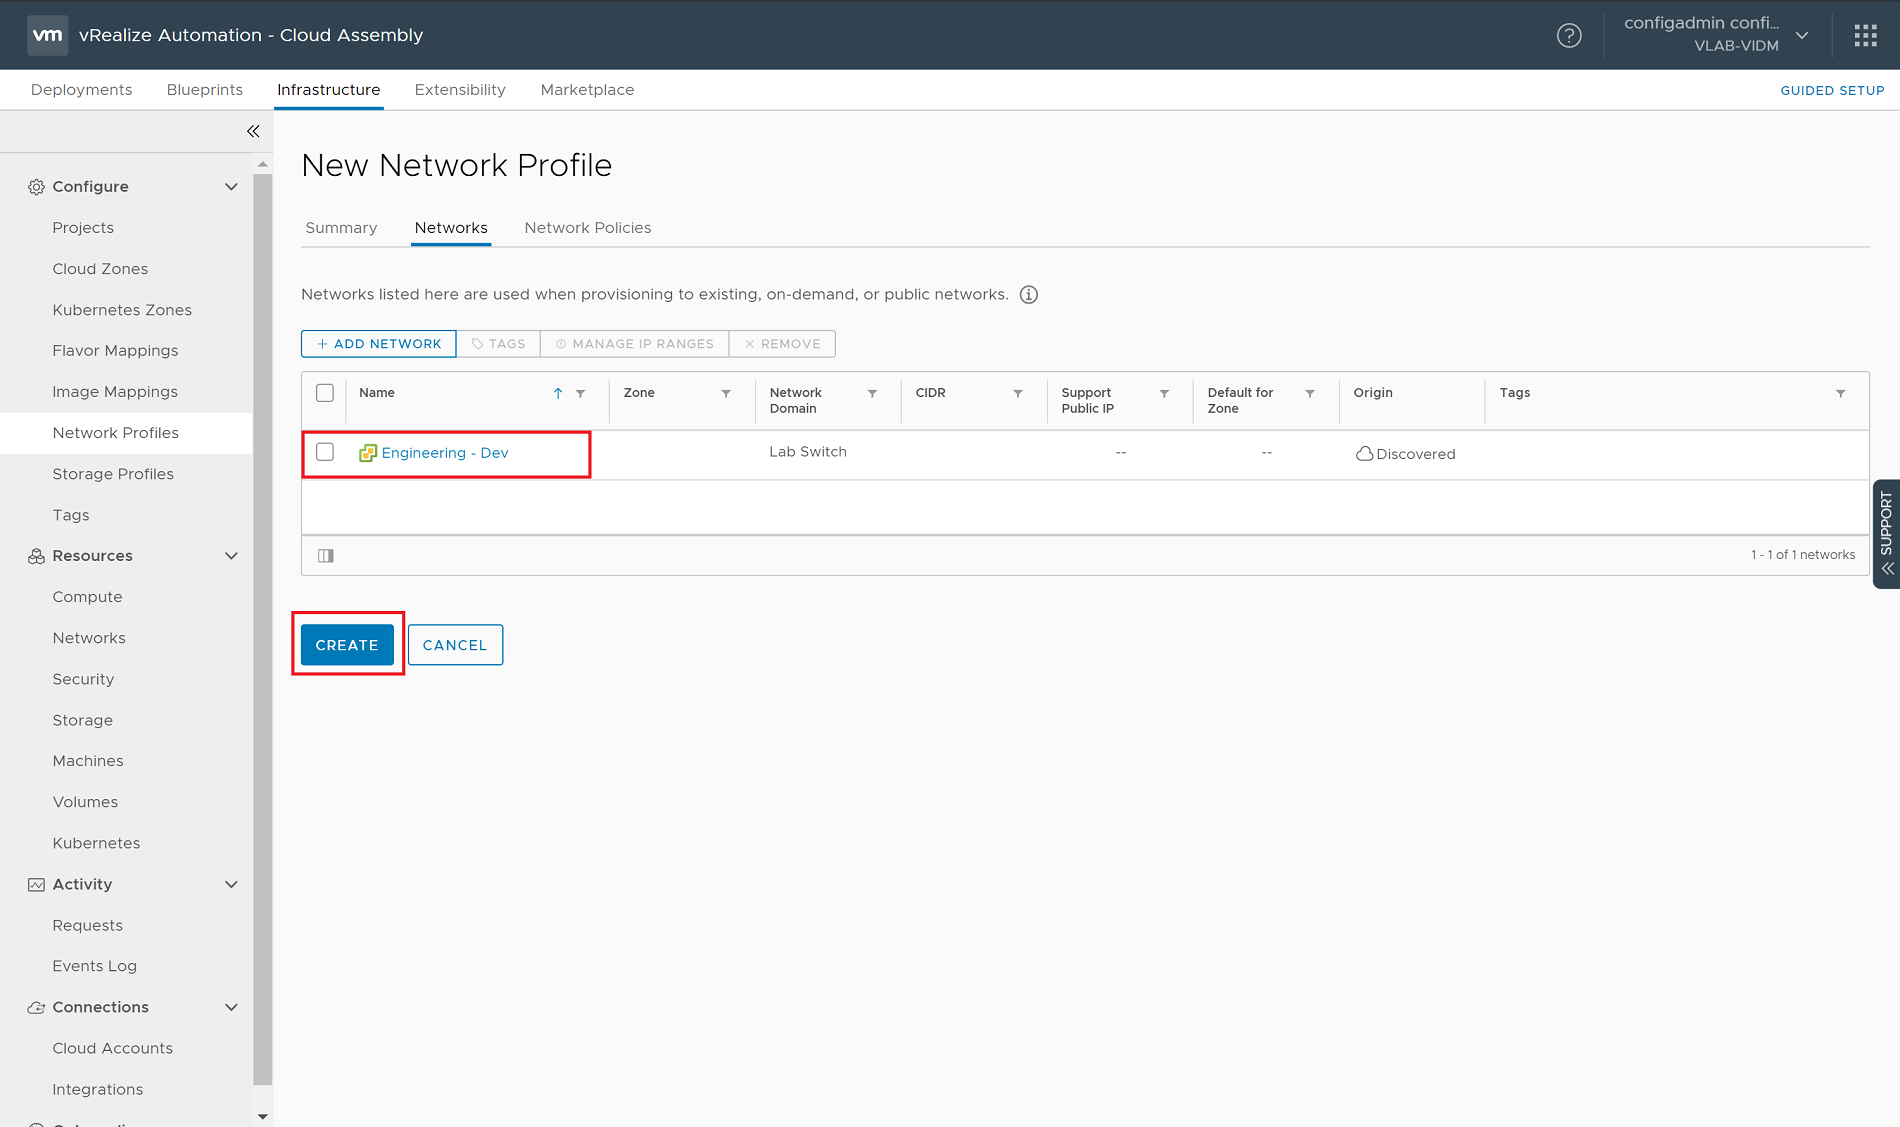
Next, we need to link our Network resource to the Network Profile. To accomplish this, click on the Networks tab at the top of the New Network Profile wizard, then click on the + Add Network button.
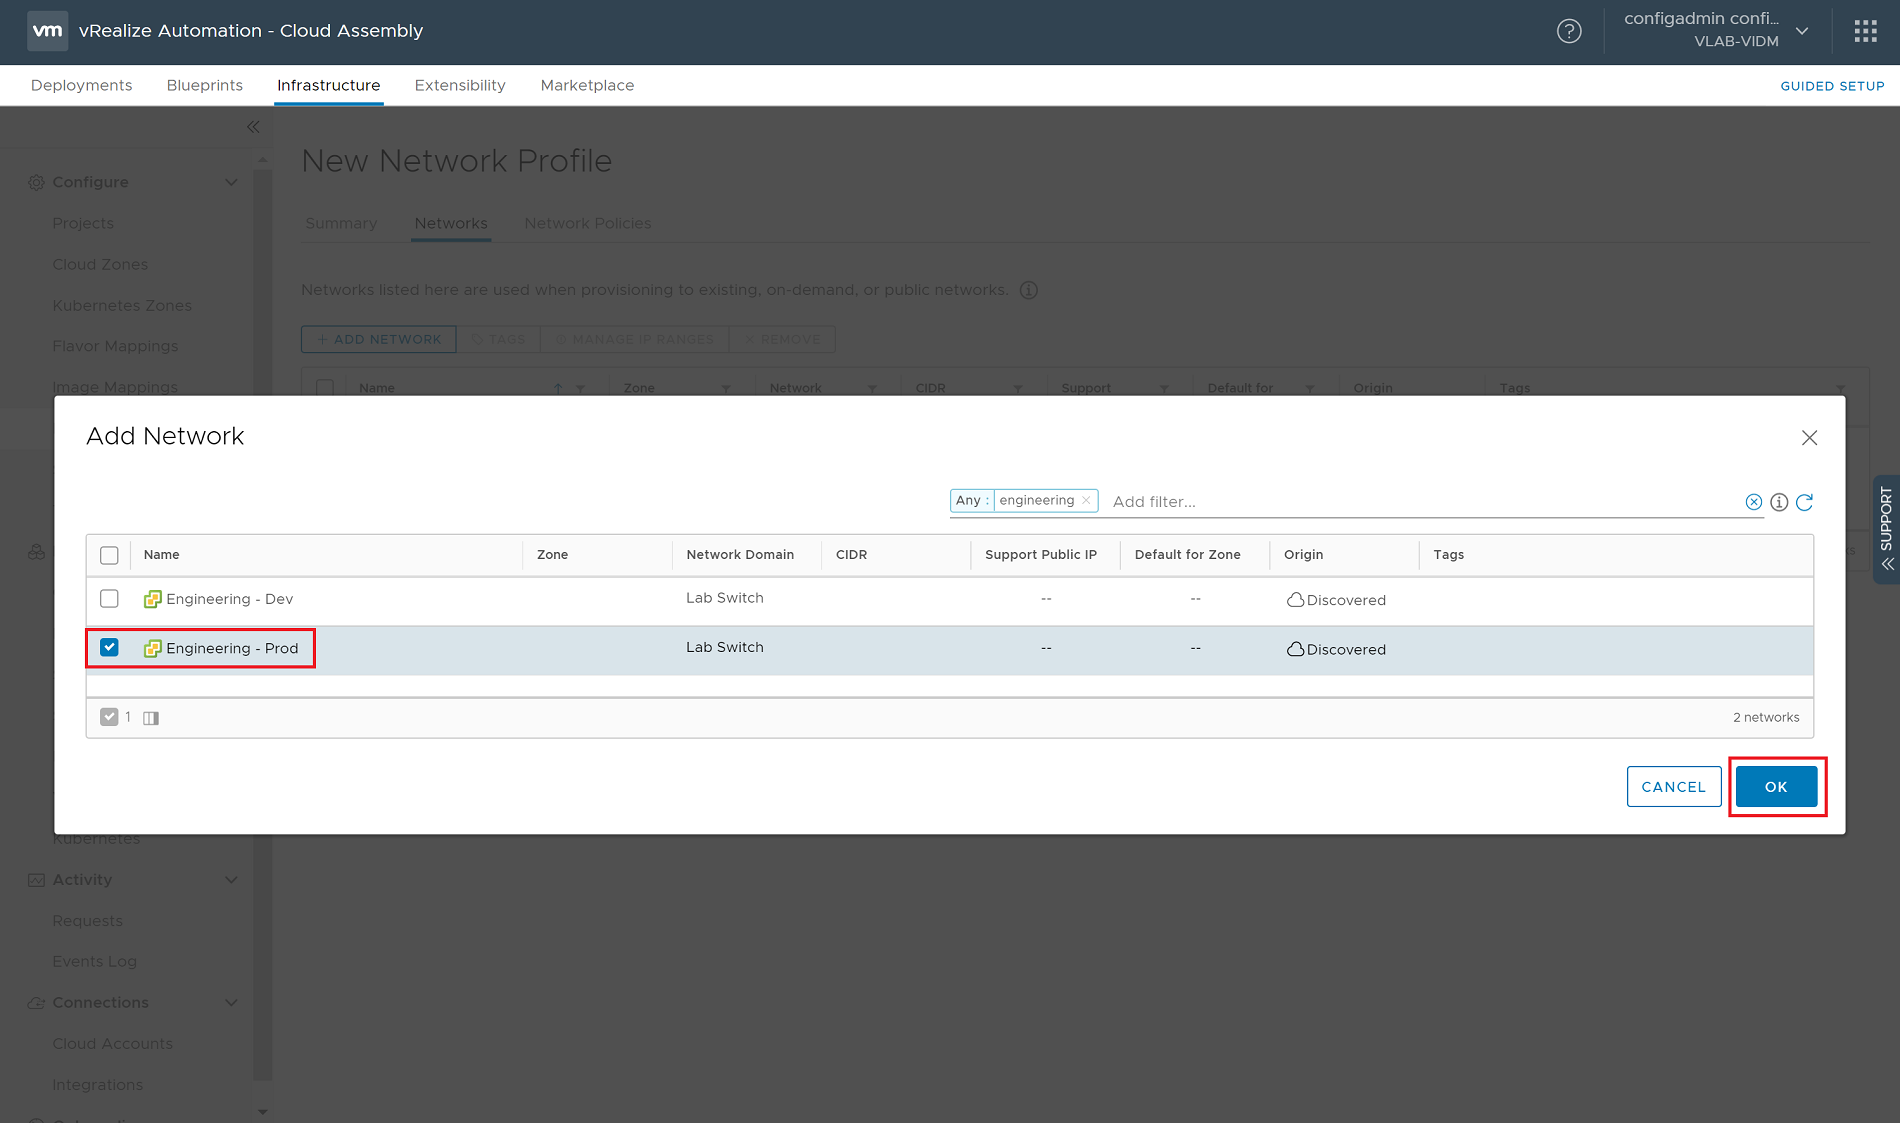
A new Add Network dialog opens that lists your Network resources. Place a checkmark next to the name of the network(s) that you wish to assign, and then click the OK button.
The network(s) you selected are now listed under the Networks tab of the New Network Profile wizard. If you are using vRealize Automation to manage IP address assignments, select the checkbox next to the network and click on the Manage IP Ranges. Utilize the resulting dialog box to either assign a new IP Range or IPAM Range. For the sake of simplicity in this walkthrough, we will assume that a DHCP server will assign IP addresses, so I have not shown these options. Click the Create button to finish creating the profile.
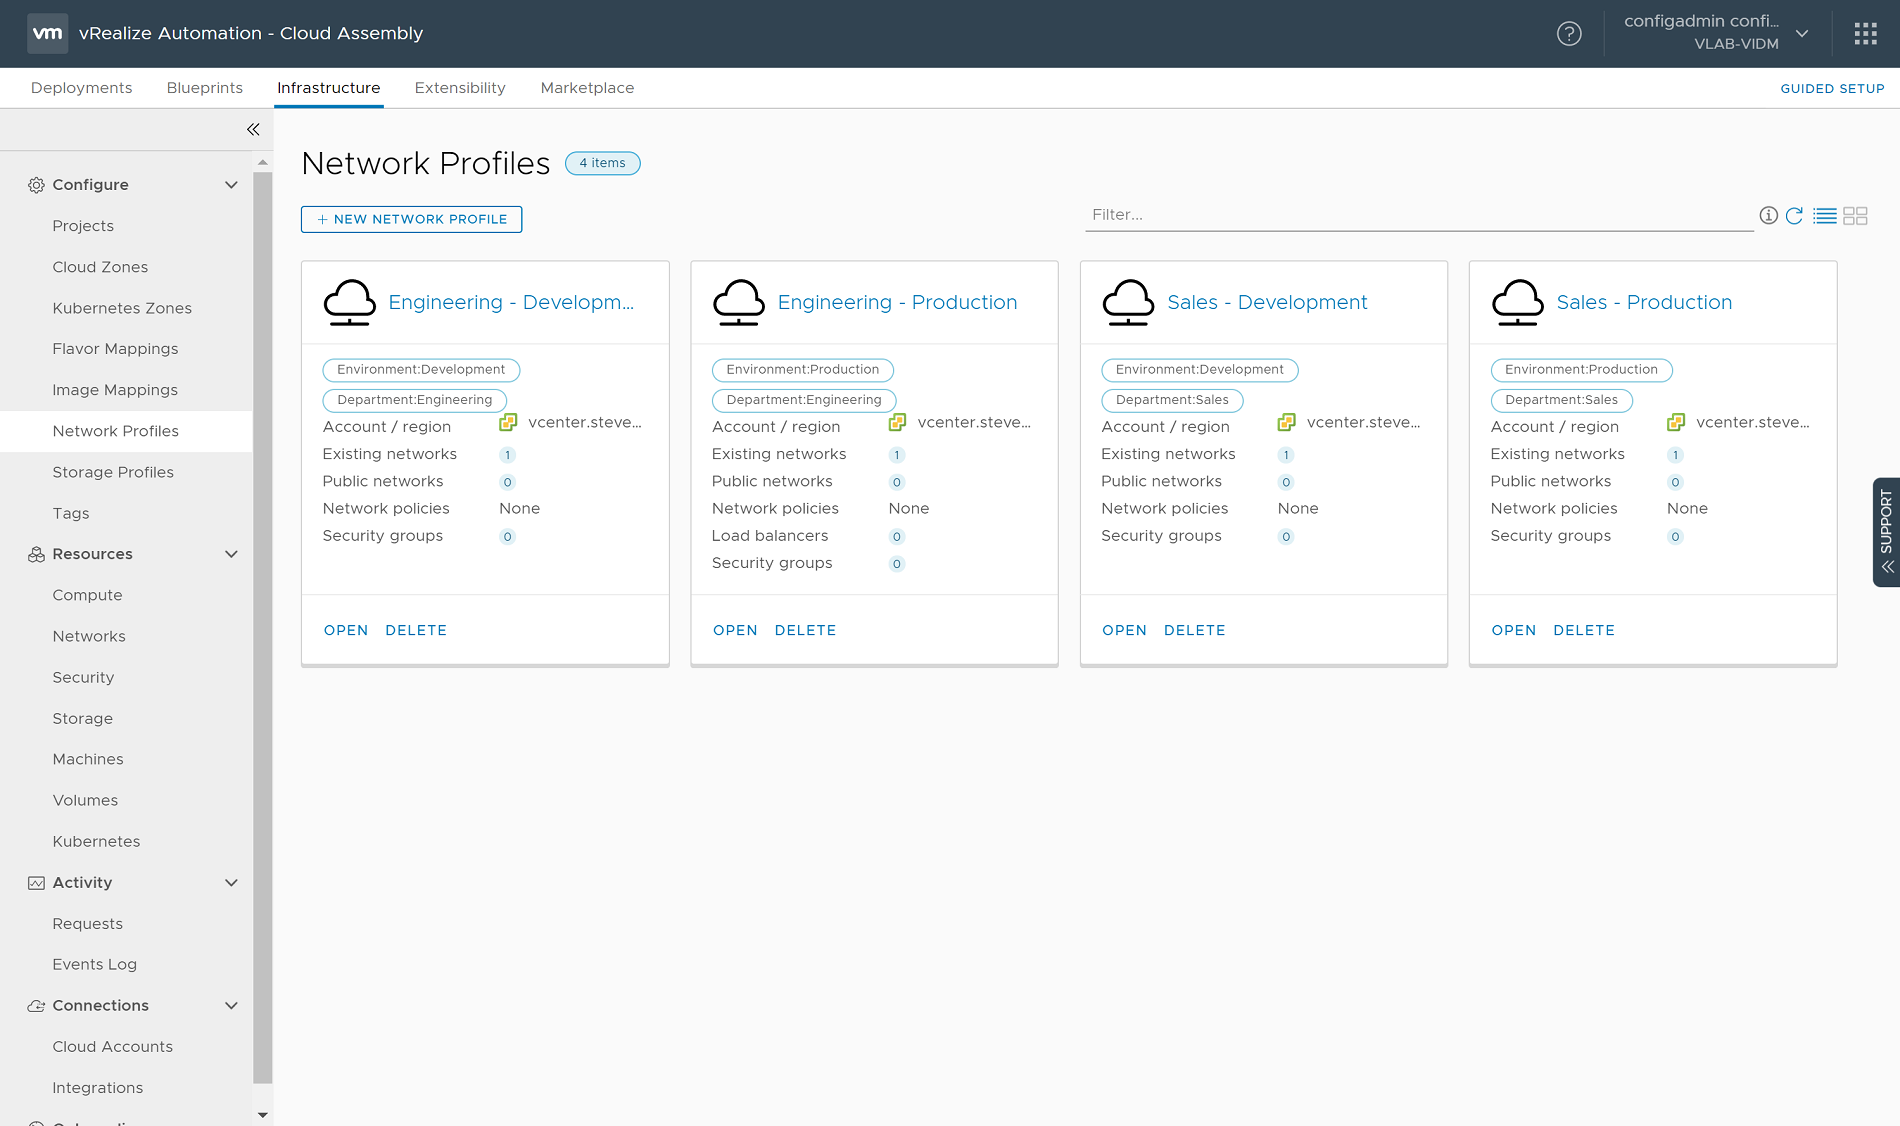
Repeat this process three additional times for the remaining networks: “Engineering - Development”, “Sales - Production”, and “Sales - Development”. When complete, there should be 4 network profiles defined that appear like the following image:
Assign Network Constraint Tags to Projects
Now that our network profiles have both environment and department tags assigned to them, it’s now time to limit the networks that each department can utilize when provisioning new resources. While still on the Cloud Assembly Infrastructure tab, select Projects from the left side under the Configure heading. This walkthrough assumes that the Sales and Engineering Projects were previously created. If not, please refer to my previous post Getting Started with vRealize Automation 8.0 Cloud Assembly for assistance with creating new Projects.
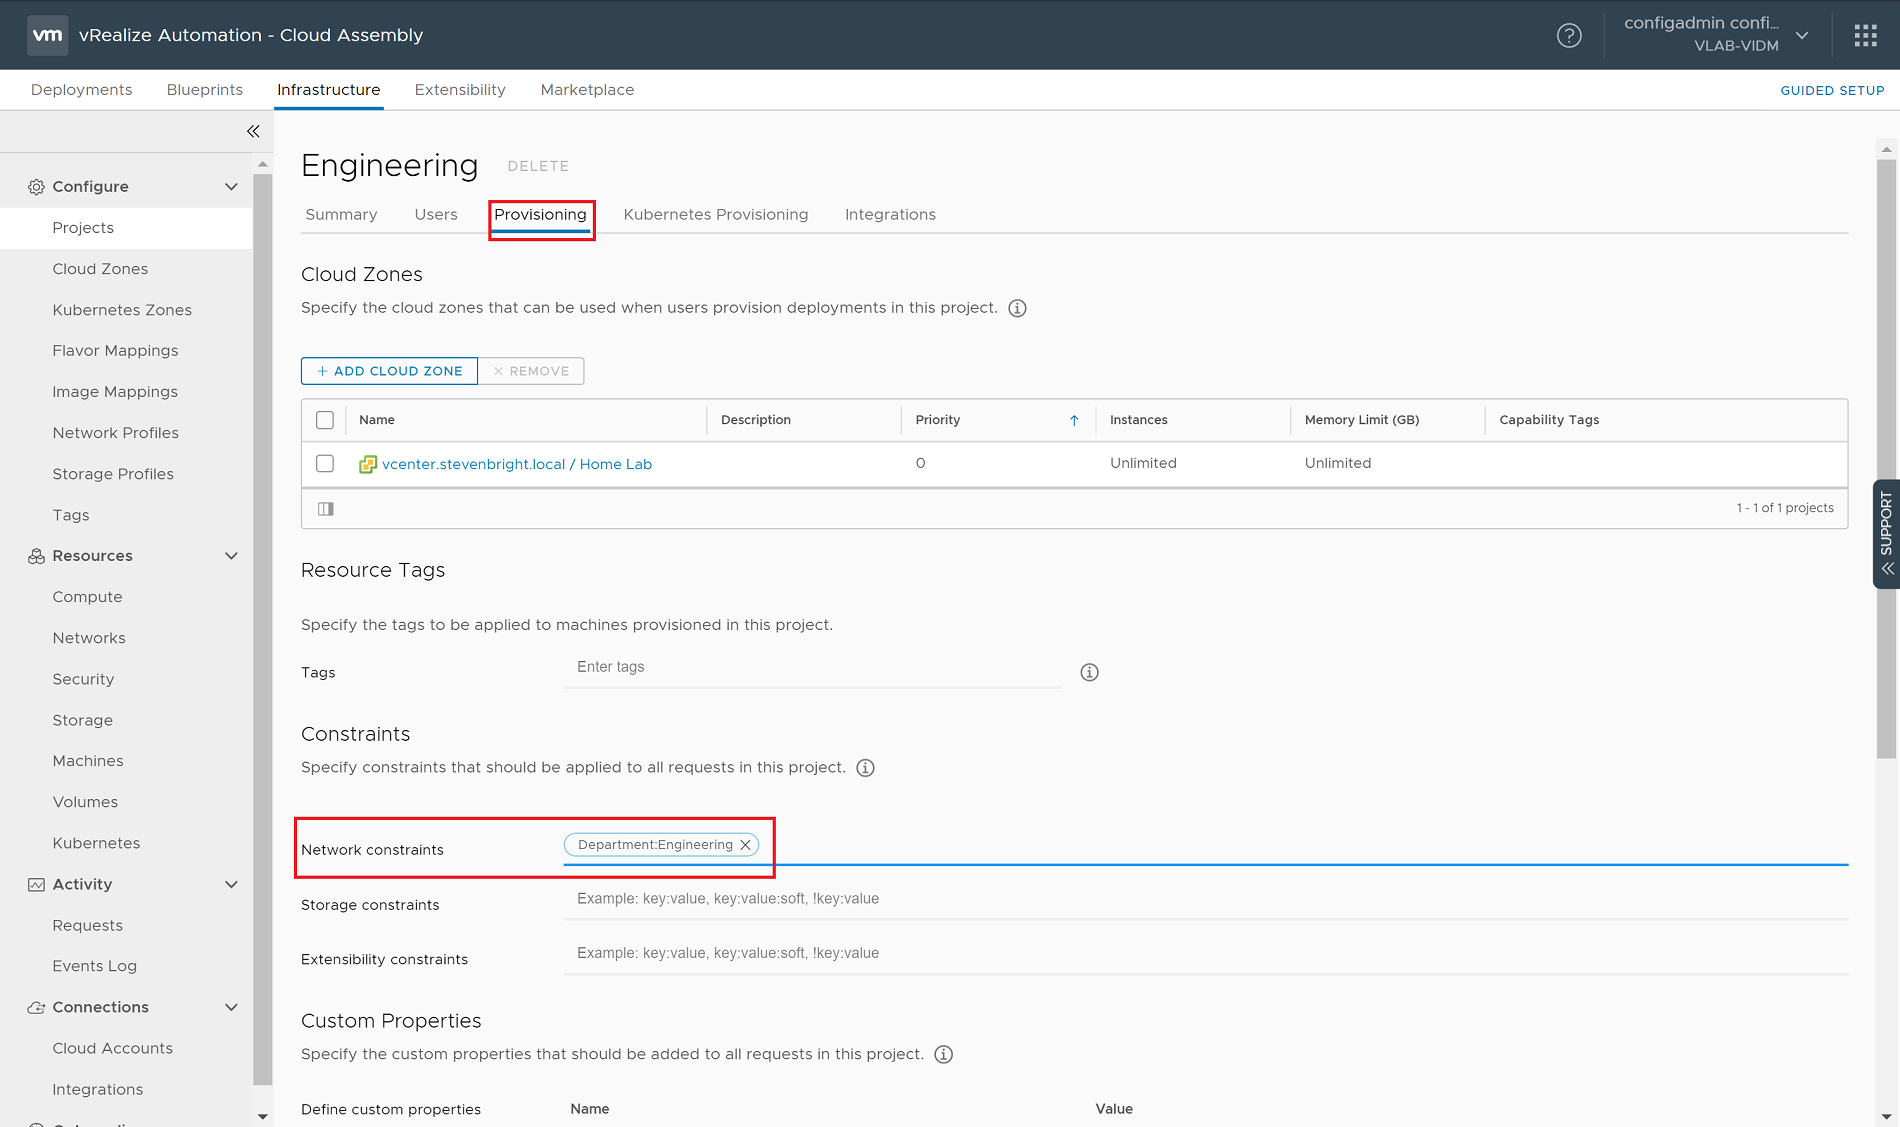
Click on the “Engineering” project and then select the Provisioning tab from the top of the project’s configuration page. Halfway down the page, there is a Constraints section that lists three categories of constraints. Click on the field labeled Network constraints and add the Department:Engineering tag that we created earlier.
Scroll down to the bottom of the page and click the Save button to save the new setting. Repeat this process for the “Sales” Project, except assign the Department:Sales tag to the Network constraints field. This process has now defined that the Engineering Project can only use networks assigned the Department:Engineering tag, and that the Sales Project can only use networks assigned the Department:Sales tag.
Now that we have assigned ownership of the networks, we need to address control over which environment our VMs are provisioned. Please join me on the next page to review the process of dynamically assigning the environment tags to our Blueprints based on the user’s input.
Controlling Access to Network Types
In our example, we want to limit our departments to only access networks that belong to their department. Additionally, we want to place development VMs on the department’s development network, while placing production VMs on their production network. For us to accomplish this, we now need to add some intelligence into our Blueprints. For this portion of the walkthrough, we will enhance the Blueprint that was created in the Getting Started with vRealize Automation 8.0 Cloud Assembly post to add a Cloud Network object that is assigned an existing network based on the Department, and Environment specified in the request.
Modifying the Blueprint
The Blueprint created in the Getting Started with vRealize Automation 8.0 Cloud Assembly post did not specify any network to be assigned to the VM. For us to assign the type of network to use, we first need to create a new input for the Blueprint that allows the user to specify if the VM is for Production or Development. To do this, we add additional YAML code to the “inputs:” section to allow for the user to select the VM’s environment:
  environment:
    type: string
    oneOf:
      - title: Development
        const: 'Environment:Development'
      - title: Production
        const: 'Environment:Production'
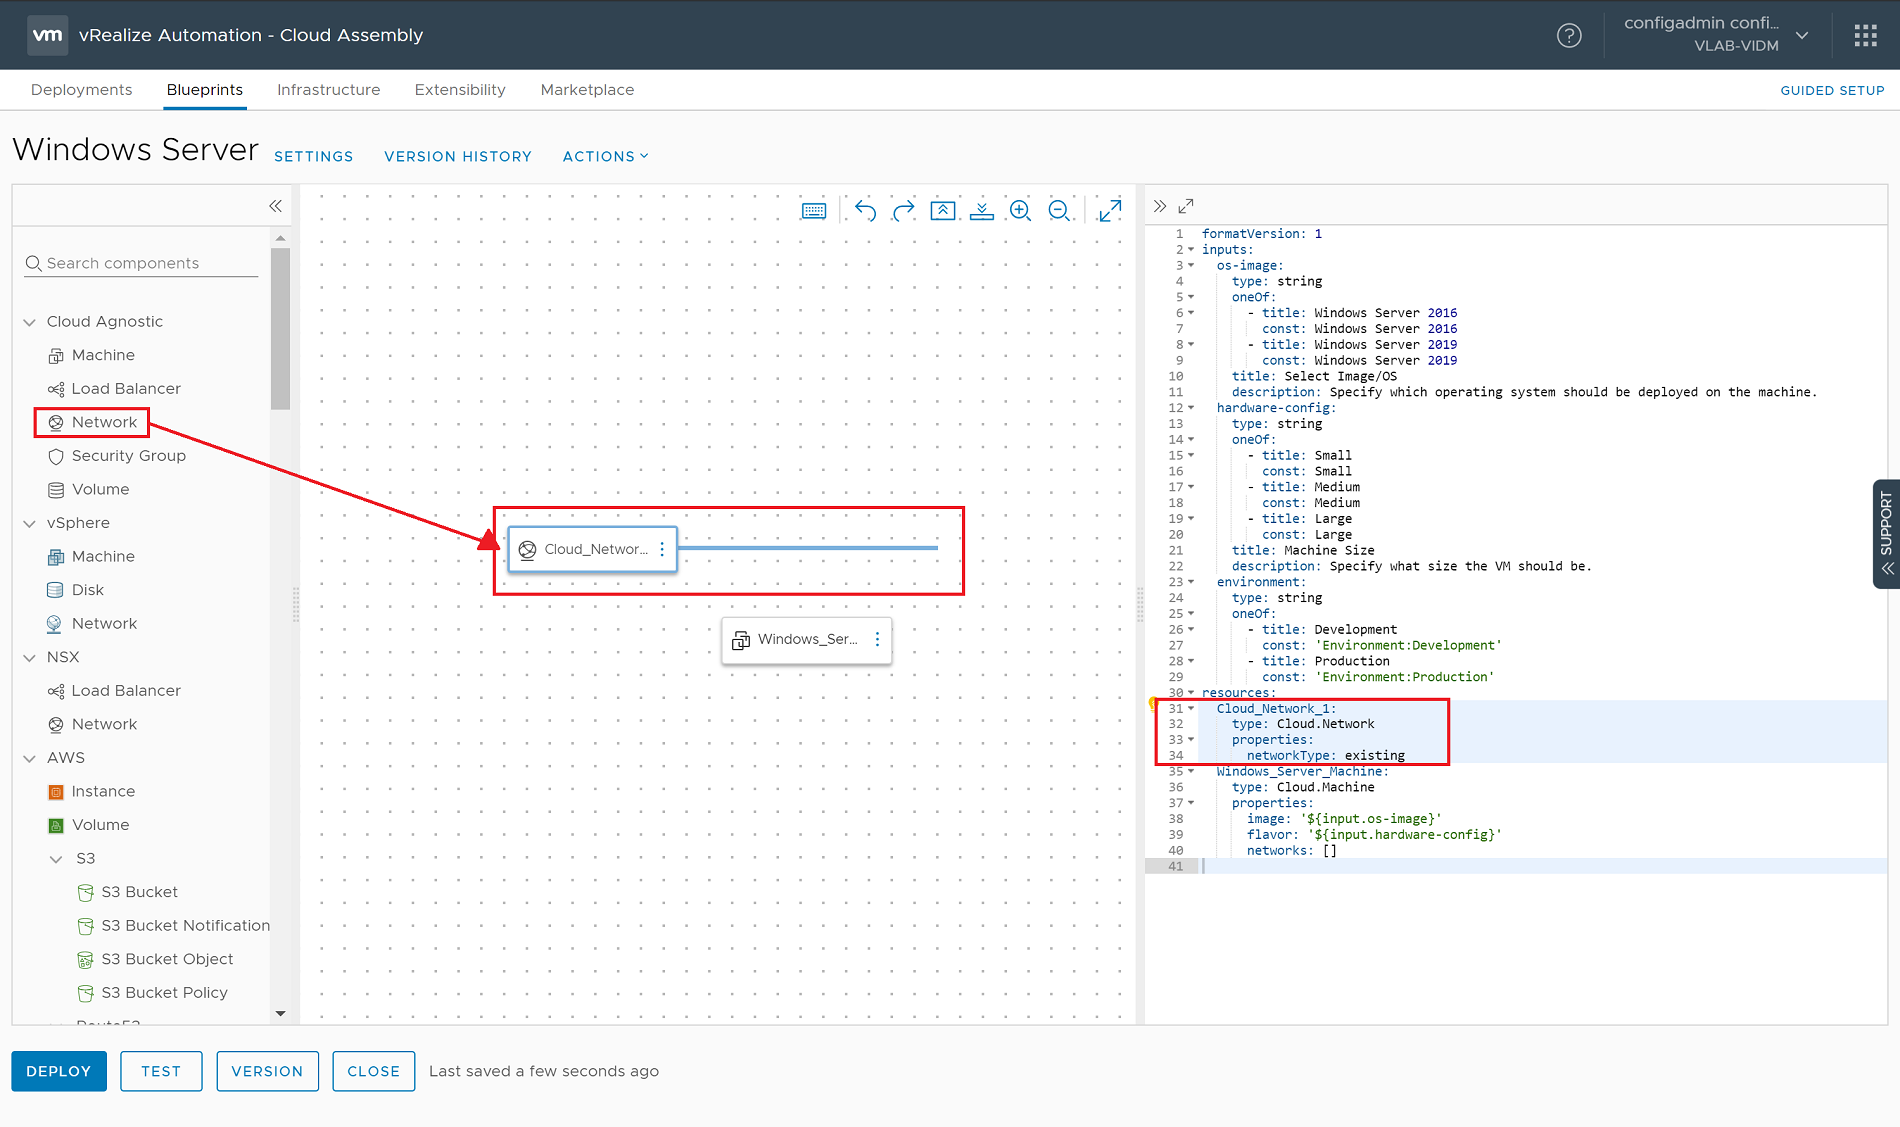
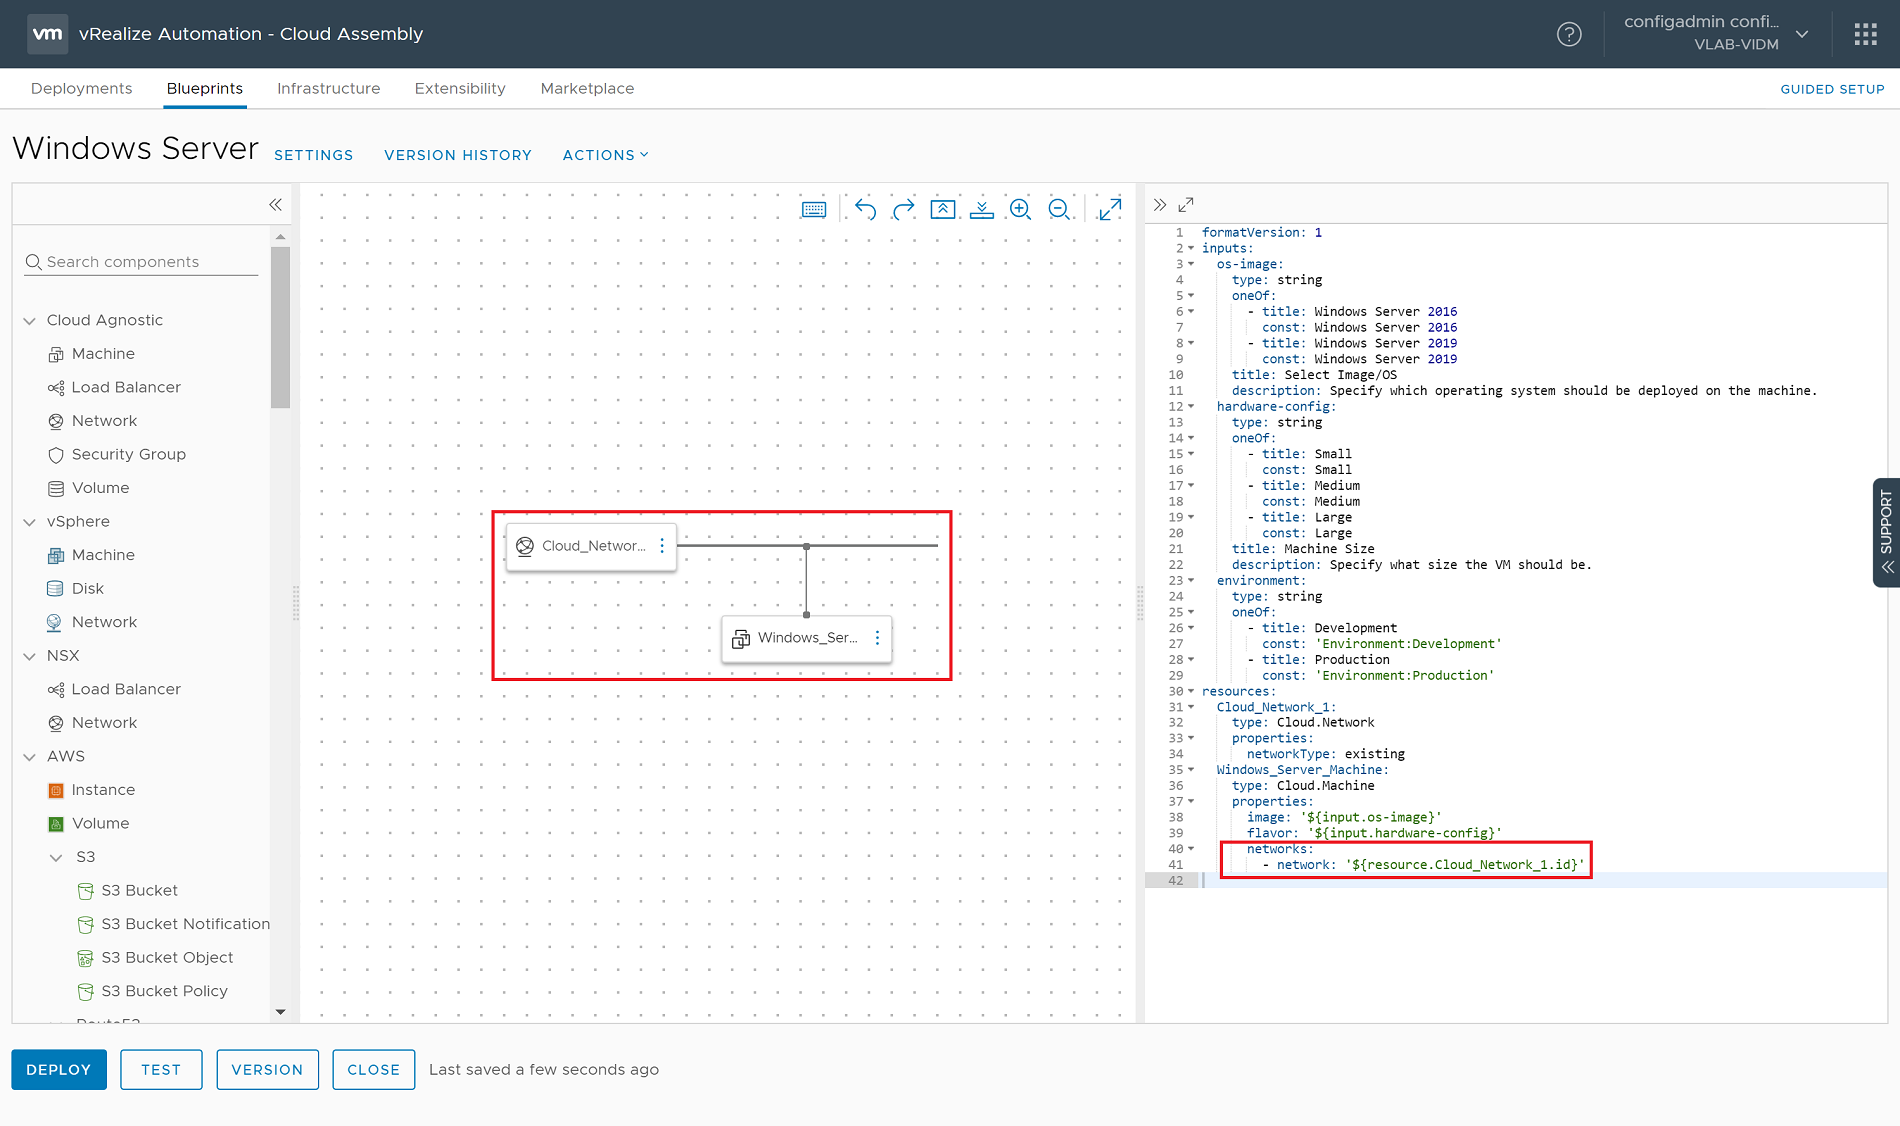
Next, we need to add a Network object to the Blueprint. To do this, click on the Network object under the Cloud Agnostic section and drag the Network object onto the design canvas.
Notice in the YAML editor that a new network is added, and under the “properties” section, it specifies a “networkType” with a value of “existing”. This indicates that the network object is an existing network and not a newly created cloud network.
Our next step is to connect our Cloud Machine titled “Windows_Server_Machine” to this network. To do this, hover your mouse over the Cloud Machine object, and you should see a small circle show up on the left side of the object. Click on this circle and drag it to the new Cloud Network object that we created. This action adds a network link from our machine to our network.
Finally, we need to add a constraint to our network object that connects it to our “environment” input. To accomplish this, we add the following code to the “Cloud_Network_1” resource under the “properties:” section:
      constraints:
        - tag: '${input.environment}'
The completed Blueprint code should be the following:
formatVersion: 1
inputs:
  os-image:
    type: string
    oneOf:
      - title: Windows Server 2016
        const: Windows Server 2016
      - title: Windows Server 2019
        const: Windows Server 2019
    title: Select Image/OS
    description: Specify which operating system should be deployed on the machine.
  hardware-config:
    type: string
    oneOf:
      - title: Small
        const: Small
      - title: Medium
        const: Medium
      - title: Large
        const: Large
    title: Machine Size
    description: Specify what size the VM should be.
  environment:
    type: string
    oneOf:
      - title: Development
        const: 'Environment:Development'
      - title: Production
        const: 'Environment:Production'
resources:
  Cloud\_Network\_1:
    type: Cloud.Network
    properties:
      networkType: existing
      constraints:
        - tag: '${input.environment}'
  Windows\_Server\_Machine:
    type: Cloud.Machine
    properties:
      image: '${input.os-image}'
      flavor: '${input.hardware-config}'
      networks:
        - network: '${resource.Cloud\_Network\_1.id}'
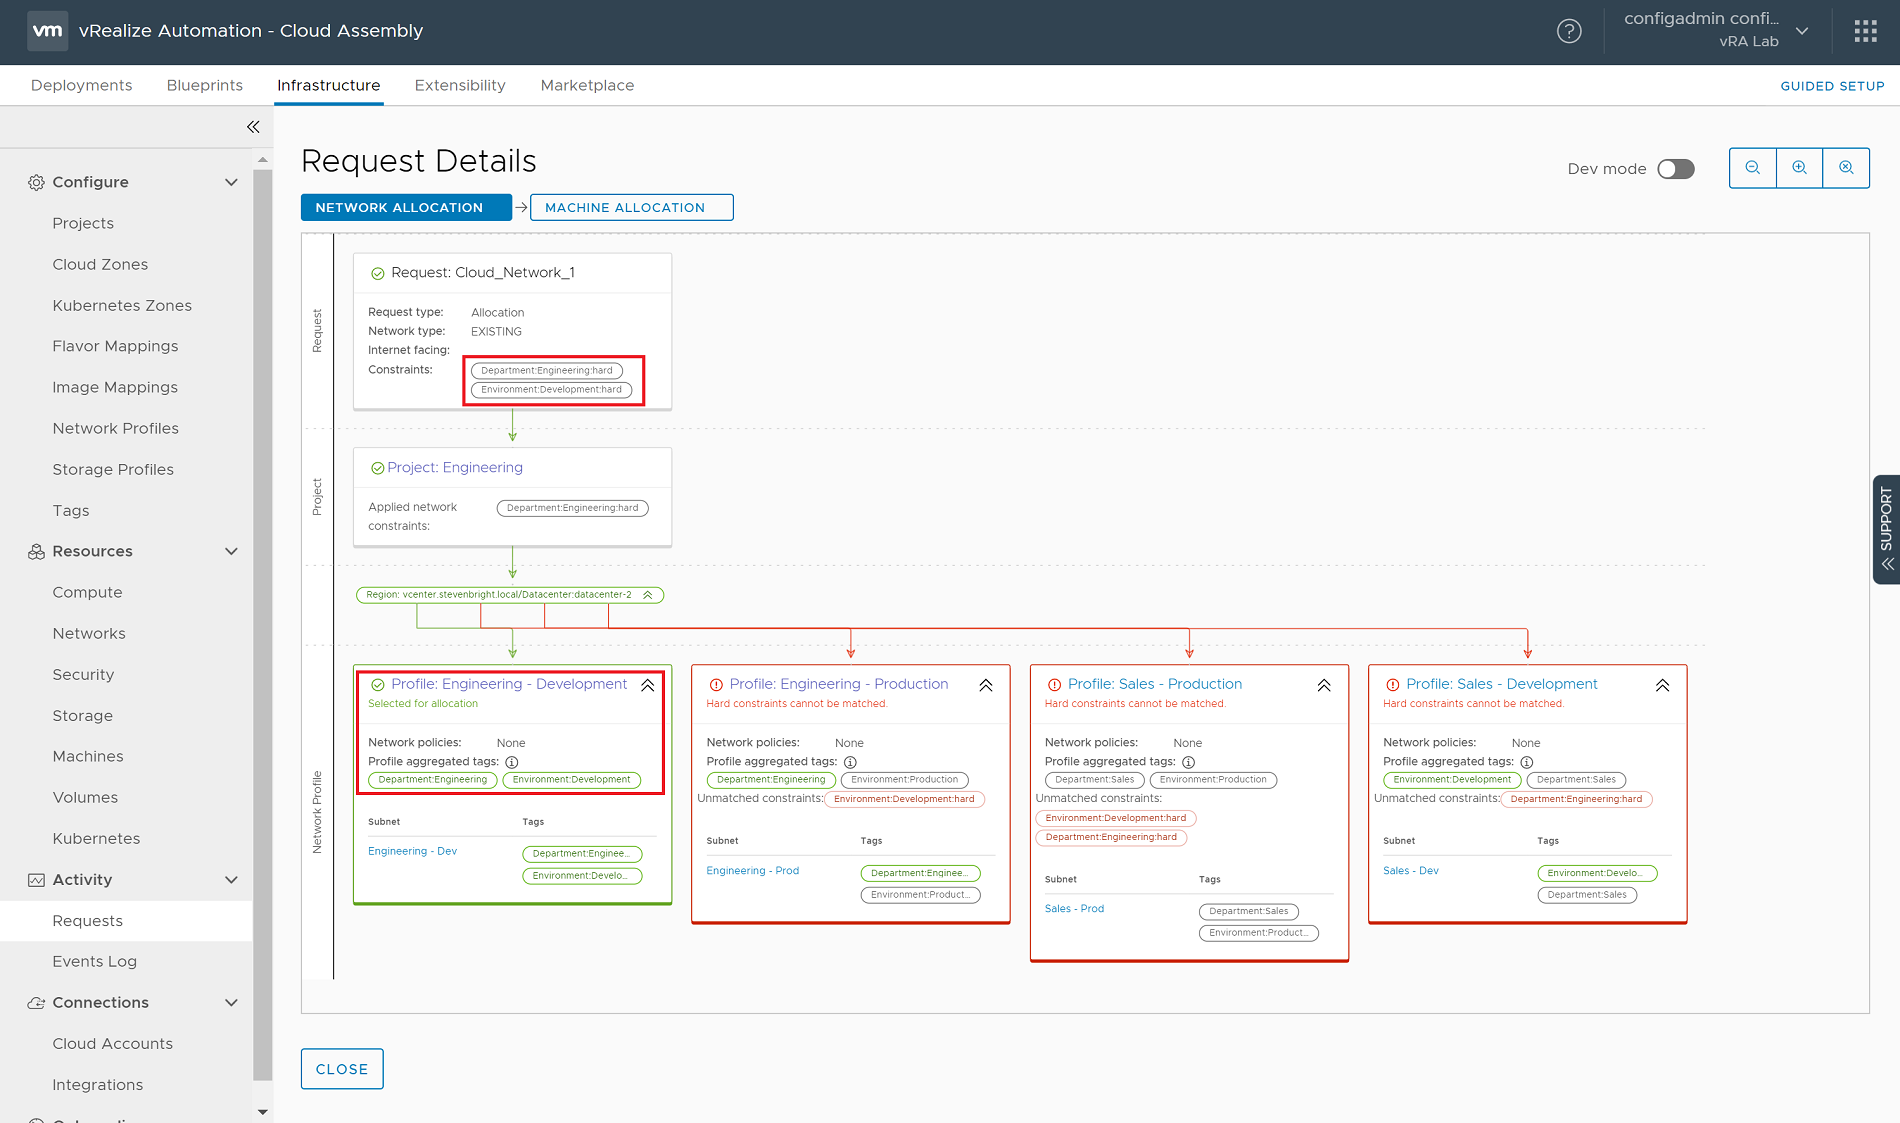
With the Blueprint code complete, you can now execute a Test provision. The resulting Provisioning Diagram created as part of the test provision is a great way to verify that your logic is working successfully. For this particular test provision, I requested that a development VM instance be deployed from the Engineering team. If you look closely at the first block in the diagram labeled “Request: Cloud_Network_1”, you will see two constraints listed for the Department and Environment. If you follow the path of the diagram, you’ll see the four Network Profiles listed that match at least one of our tags, however only the first one was selected as it matched both the Environment and Department tags.
Also, notice that the constraints in the first box labeled “Request: Cloud_Network_1” show “:hard” at the end of them. By default, any constraint defined in vRealize Automation 8.0 is treated as a hard constraint unless you specify it as “soft”. For additional information on constraints in vRealize Automation 8.0, view the VMware documentation titled: Using constraint tags in vRealize Automation Cloud Assembly
Final Thoughts
This walkthrough only provides a simple example of how tags can be used within vRealize Automation 8.0 Additional use cases could involve custom tags for passing information into vRealize Orchestrator or ABX functions during extensibility actions, tagging of resources to utilize during reporting, or simply for organizing objects and making them easily searchable within the UI.
Several standard tags are assigned to resources as they are provisioned such as Project, Requestor, etc. To see a full list of these tags, visit the vRealize Automation 8.0 documentation page Standard Tags.
When using tags to control access to resources, keep in mind that any Project that does not have a constraint tag assigned will be allowed to any resource regardless of whether or not the resource is tagged.
Noticeably missing in vRealize Automation 8.0 is the ability to limit the amount of storage and memory that a Project can utilize within individual vSphere clusters. While it does allow the Cloud Administrator to specify a memory limit at the Cloud Zone level (e.g the vCenter Data Center, AWS availability zone, etc.), it does not allow for specifying limits at the vSphere cluster level. Limiting storage resources does not appear to exist in the product at all.
See Also
Search
Get Notified of Future Posts
Recent Posts
